Last Updated on: 26th October 2024, 08:39 pm
Canyonlands National Park is the largest of Utah’s Mighty 5. It’s comprised of multiple different districts such as The Needles, the Maze and the Island in the Sky, the latter of which is the most popular by far. This district is situated atop a huge 1,000 ft-high mesa which offers some of the Southwest’s most iconic views.
The following guide covers what one can reasonably expect to do over the course of a single day. This itinerary is more driving-focused overall, though it does include several short hikes. While there are indeed longer and more strenuous hikes – not to mention scenic drives – that one can do at the Island in the Sky, you’d need an additional day or two to do them.
Despite being Utah’s largest park, Canyonlands happens to be the least visited of the Mighty 5. But why? Admittedly, I didn’t have any special expectations before visiting the Island in the Sky, thinking it wouldn’t be much different from other spots in the Southwest.
Yet as I explored the various viewpoints and hikes throughout the mesa, I was continually blown away by what I was seeing. The area could perhaps best be described as a mix between the Grand Canyon and Monument Valley – plus a few unique surprises thrown in.
While it’s not clear why this excellent park is so overlooked, it ended up being one of my favorites, especially after also visiting the amazing Needles district.
For more information on Canyonlands National Park entry fees, where to stay in Moab and how to reach the town, be sure to check the end of the article.

Navigating the Trails
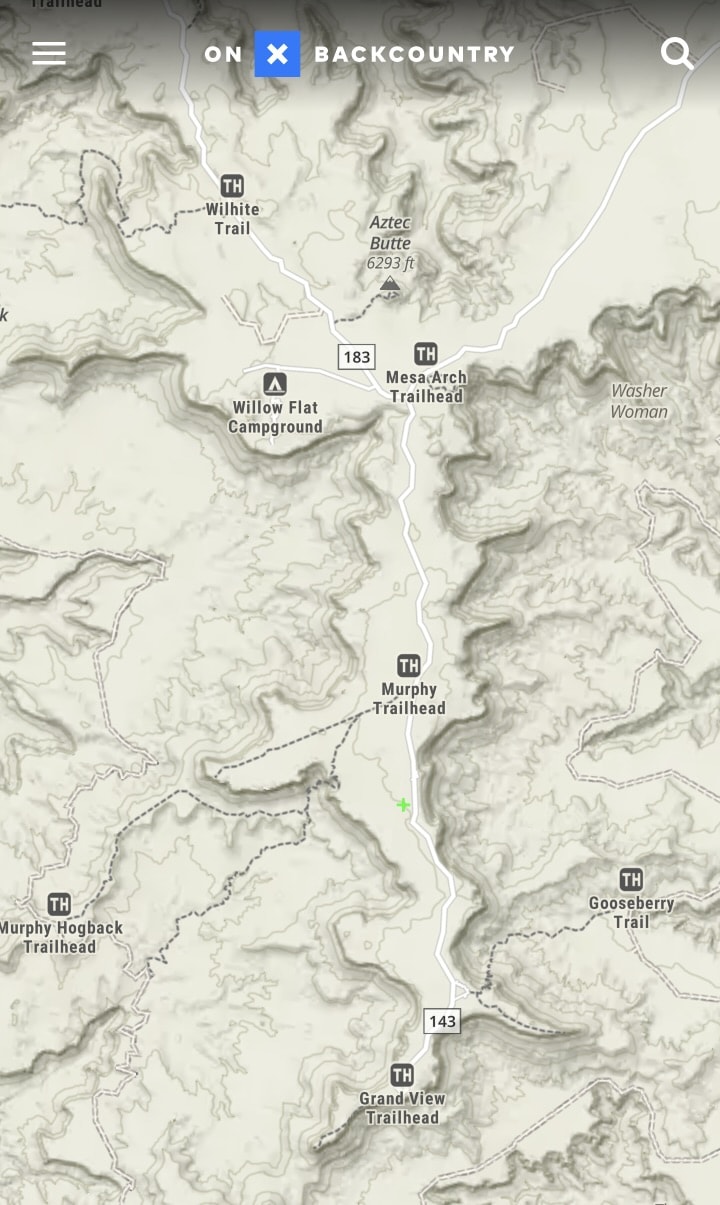
Most of the Island in the Sky and Canyonlands as a whole lack reception, so it’s vital to download trail maps in advance that you can later access offline. The two best apps for this are AllTrails and onX Backcountry, both of which require subscriptions that cost around $30 per year for offline access.
Just be sure to have everything downloaded on your phone in advance, as once you make it to the heart of the park, it will already be too late! The free Maps.me app can also come in handy.
Arriving at The Island in the Sky
In total, the drive to the Island in the Sky district from Moab takes about 45 minutes. In my case, I left my hotel a little after 7:00, arriving at the Visitor Center around 8:00.
As you’ll learn quickly upon your arrival in Moab, amazing scenery is not restricted to the boundaries of the local parks. During your drive up, for example, you can stop for views of the Monitor and Merrimack Buttes, both of which are around 600 ft high.

Note that when driving up to the Island in the Sky from Moab, you’ll pass by the entrance to Dead Horse Point State Park which offers similar views. While I do believe that Dead Horse Point is worth visiting, this jam-packed Island in the Sky itinerary should last you from morning until evening.
While not terribly efficient, it would probably work out better to visit Dead Horse Point on another day, such as after one of your days at Arches. See our detailed Utah Mighty 5 itinerary to learn more.


While stopping at the Visitor Center isn’t a must, it does provide some good information on the geology of the park. And you can also ask the rangers about specific hikes.
You’ll also find a popular overlook just across from the Visitor Center, but the lighting isn’t ideal in the morning. As such, I made sure to stop here again on my way out of the park in the evening.
Shafer Canyon Viewpoint
Just past the Island in the Sky Visitor Center, you’ll find the Shafer Canyon Viewpoint which overlooks the Shafer Trail. The rough dirt road is known for its countless switchbacks. And believe it or not, this is an alternative way to reach the Island of the Sky from Moab!

For those interested, the journey begins along Potash Rd, which is also unpaved and very rough in parts. Needless to say, a 4×4 is a must.
Potash then directly leads into the Shafer Trail, which has a total elevation gain of around 1400 ft (427 m). The full journey should take a couple of hours.
It’s possible to drive this route either on your way to the Island in the Sky or on your way down. Many people, however, prefer the journey up, as it’s both less intimidating and also easier on a vehicle’s breaks.


While not covered here, I’d later take a Shafer Trail tour a few days after my initial Island in the Sky visit, which was quite a thrill. Learn more in our dedicated guide.
Mesa Arch
In regards to natural arches, Canyonlands can’t hope to compete with nearby Arches National Park. Nevertheless, one of the park’s most famous landmarks is indeed an arch. Mesa Arch can be reached via an easy loop trail that’s around 0.5 miles in total.
The arch is especially popular at sunrise, when photographers line up to catch the first rays of the sun appearing between the arch and the distant horizon. But it’s said to get extremely crowded each morning.

Being one of the most popular landmarks at the park, I also expected it to be quite crowded at the time of my arrival around 8:30. And the trail did indeed feel packed during the walk over.
But to my great surprise, I arrived at Mesa Arch to find nobody there! I can’t quite explain why or how, other than it being a lucky fluke. I made sure to take all the pictures I could during the three or four minutes I had it to myself.


The beautiful arch spans around 90 feet, while looking through it offers tremendous views of various canyons and towering buttes below. It’s easy to see why it’s become one of the park’s most iconic landmarks.
Expect to spend around thirty minutes here.

After Mesa Arch, my original rough itinerary had me continuing south along the district’s main road, Grand View Point Rd. But it wasn’t until my visit that I realized that the lighting probably wouldn’t be ideal in that area in the morning.
Therefore, I made an impromptu decision to check out all the sites along Upheaval Dome Rd first.
Aztec Butte
Turning onto Upheaval Dome Rd, you’ll soon encounter a turnoff for the Green River Overlook, but I decided to save that for the way back. Instead, I decided to begin with the next landmark, Aztec Butte, where I spent around an hour in total.
Aztec Butte features two main attractions: an ancient granary and the butte itself, which can be quite strenuous to ascend. First, I decided to start with the granary, which is a relatively gentle hike that most visitors should be able to handle.

Hundreds of years ago, these lands were occupied by the Ancestral Puebloans. While the Puebloans (also known as Anasazi) built their biggest cities at places like Chaco Canyon, Mesa Verde and Hovenweep, they also established smaller settlements throughout the Southwest. And one of their ancient granaries here still survives.

While it’s unclear why this area is known as Aztec Butte, it could be due to Spanish settlers labeling various ruins that they encountered as ‘Aztec ‘ despite having no relation to the Aztec Empire.
When finished with the granary, it’s time to head over to the Aztec Butte itself. The sandstone butte is about 200 ft higher than its surroundings. And if you’re wondering where the trail to the top begins, well, there isn’t one.
While you will find some stone markers indicating the best path up, ascending the butte is largely a freeform scramble.


The rock isn’t very slippery, but it can get quite steep in some parts, and you’ll want to take things one step at a time. The higher you get, the less clear the route to the top becomes, so you’ll have to do a lot of improvising.


But the effort is well worth it. Once at the top, you’ll encounter even more Ancestral Puebloan ruins which were built sometime in the 13th century AD. Also be sure to walk around the top of the butte for spectacular views in all directions.
Needless to say, you’ll want to be especially careful for the descent. Be sure to put on the best shoes you have for this excursion.


Whale Rock
For those who aren’t quite up for the challenge of ascending Aztec Butte, Whale Rock serves as a great alternative. While this monolith is massive, it’s a lot longer than it is high, making the hike a lot gentler.
And while the views here are quite different from those of Aztec Butte, they’re equally impressive. Expect to spend around 30-40 minutes here.


From the parking area, it’s about a half-mile to reach the base of the rock. Then, simply make your way upward and keep walking along the ridge. While a light scramble is necessary to reach the highest level, it’s nothing particularly challenging.

Keep walking along the rock, and you’ll eventually get to a point when you can’t walk any further due to a steep drop. From here, you can enjoy an amazing 360-degree view from the center of the mesa.
Not only is Whale Rock a good place to avoid the crowds, but it provides some of the best views of the entire park and shouldn’t be missed.


Upheaval Dome
Upheaval Dome is among the most challenging yet rewarding landmarks to visit at the Island in the Sky. As this is a popular landmark, finding parking will be the first challenge you’ll have to deal with.
From the trailhead, there are two main viewpoints to hike to which involves a fairly steep uphill climb. In total, I spent a little over an hour here, though you can see everything in less time if you’re in a rush.
This is also the start of the much longer Syncline Loop Trail, which is considered a very strenuous hike that will take most of your day, so we won’t be including it here.


Arriving at the first viewpoint, you’ll soon get a clear view of Upheaval Dome from above. But you can get an even clearer view if you carefully make your way downward toward the edge.
But how did this colorful mound in the middle of a crater come to be? Scientists aren’t really sure, but it could either be the result of a meteorite impact or a salt dome uplift.

Next, you can proceed across the rocks over to the second overlook. During my visit, it actually started raining once I got to the second viewpoint. But fortunately, the rain stopped after a few minutes and some of the clouds cleared away.
The sun then really brought out the crater’s colors.


The massive crater stretches out to 6.2 mi (10 km) in diameter. With all its colors, Upheaval Dome reminded me a lot of Death Valley’s Ubehebe Crater.
But it’s a lot older, likely dating back to around 170 million years ago during the Jurassic period.

In this district of Canyonlands that’s mainly known for its canyon views, Upheaval Dome shows how geologically varied the Island in the Sky really is.
Next, it’s time to retrace your steps, heading back to the parking lot and then back across Upheaval Dome Rd.

Green River Overlook
As mentioned above, you’ll encounter the turnoff for the Green River Overlook shortly after turning onto Upheaval Dome Rd. But it’s easier to save for the return journey.

The Green River runs through much of Canyonlands National Park. It’s what divides the Island in the Sky and the Maze districts. And some 20 miles away is where the Green and Colorado Rivers meet.


Not only is this overlook remarkable for its shapes and colors, but it’s fascinating to be able to observe so many different layers of the landscape at once.
The overlook also offers views of various sandstone formations, buttes and distant mountains. Out of all the viewpoints at Island in the Sky that you can easily drive to, this one is the most impressive.

White Rim Overlook
Next, turn right onto Grand View Point Rd and drive almost all the way to the end, stopping at the trailhead for the White Rim Overlook. This is another spectacular overlook, though it takes a bit more effort to get to.
Expect your visit to take you around 30-40 minutes in total.


Getting to the end requires a 0.8-mile hike which is largely flat and uneventful, but the views it offers are anything but.
In between the top of the mesa and the level of rivers is what’s known as the White Rim Sandstone level. And there’s even a long road which loops around it, appropriately known as the White Rim Road.


The entirety of the White Rim Road stretches out to 100 miles, so most people only do small segments of it. But no matter how much you decide to drive, it’s a rough road for which a special permit is required. Learn more here.
As mentioned earlier, I’d later take a tour up the Shafer Trail, but our tour also included a brief drive along part of White Rim Road. But if you’re mainly interested in the White Rim Road but aren’t sure about driving it yourself, consider a special White Rim tour like this one.

Grand View Point Overlook
Finally, the Grand View Point Overlook Road culminates at the Grand View Overlook itself. This one also involves a bit of hiking.
While you will see excellent views from the very beginning, a trail will take you to a couple of other vantage points, with the whole journey taking about 40-60 minutes roundtrip.


The trail culminates at an outcrop that you can climb up to enjoy more panoramic views. While indeed impressive, I personally didn’t enjoy the Grand View Point as much as the Green River or White Rim Overlooks.
But that may have partially been due to the weather, as it became pretty overcast by the time I arrived.


Next, I retraced my steps and returned to the parking lot. It was already around 17:30 in the evening by the time I left the Island in the Sky.
As mentioned above, this guide doesn’t include any of the longer hikes, while there are also scenic drives to experience as well. Furthermore, you’ll encounter plenty of additional overlooks across the mesa.
One would need at least a few days to see the Island in the Sky in full, and that’s not even including Canyonlands’ other districts!


Additional Info
At the time of writing, there don’t seem to be any tours that simply take you around to the various viewpoints atop the Island in the Sky. You can, however, take a 4×4 to reach the top of the mesa via the Shafer Trail and its many switchbacks. I took this tour and had a great experience.
The tour I took also included a small portion of the White Rim Road. But if you’re looking for an even more extensive tour of the White Rim, this tour is also an option.
Considering how Moab serves as the base for two National Parks, one State Park and plenty of other nearby attractions, you’ll likely be spending at least several nights here.
Moab is one of the most touristy towns you’ll encounter in the Southwest, so there’s no shortage of accommodation options to choose from.
I stayed at a centrally-located motel called the The Virginian Inn Moab Downtown. Overall, I had a comfortable stay and consider it a good value.
The most peculiar thing about this motel is that the receptionists are located in the Philippines! There is someone on-call 24 hours, and you can start chatting with them via a video conferencing machine as soon as you enter the lobby. It felt rather strange at first, but the system actually worked out pretty well.
Other highly-rated accommodations for a similar price range include the Expedition Lodge, the Bowen Motel and the Rustic Inn.
Despite how popular it’s become, Moab remains relatively difficult to reach due to its geographical isolation.
The nearest major airport would be Salt Lake City, which is around four hours away. While Moab does have its own small airport, it apparently only has direct connections with Salt Lake City or Denver.
It’s also possible to take an Amtrak train from Salt Lake City to the nearby town of Green River, Utah. In any case, you’ll need to rent a car to get to Moab and explore the nearby parks.
For those doing a longer trip across Utah, Moab is about 2.5 hours from Capitol Reef National Park. If you’re coming from the Monument Valley area, Moab is about 2 hours and 15 minutes from the town of Mexican Hat.
Moab is also just about two hours from Mesa Verde National Park, Colorado.
At the time of writing, Canyonlands National Park costs $30 per vehicle to enter (learn more here).
If you’re visiting from abroad, note that in contrast to many other countries, US parks typically charge per vehicle rather than per person. However, if you’re traveling by bicycle instead, they’ll charge you for an individual pass which costs $15, while those on motorcycles will be charged $25.
Considering how many National Parks and National Monuments there are to see in the Southwest alone, the best option for most will be to buy an ‘America the Beautiful’ Annual National Parks Pass.
These cost $80 for the year. In most cases, you’re already saving money by just visiting four National Parks/Monuments anywhere in the country within a full year.
What’s more, is that only one person in your vehicle needs to have the pass. Additionally, seniors can buy the pass for just $20. So if you have someone over 62 in your party, just have them get the annual pass and everyone else will be set.
As for where to get the pass, you can purchase it in person at most National Parks or Monuments. But you can also order it in advance online.
Planning to do a longer trip through the incredible state of Utah? Be sure to check out our detailed Utah road trip itinerary. In addition to the Mighty 5, you’ll also learn about some amazing State Parks and National Monuments to stop at along the way.
And in regards to Utah’s Mighty 5, how does Canyonlands National Park stack up against the others? You can find our rankings of the five parks here.