Last Updated on: 28th October 2024, 01:06 pm
While Zion’s Angels Landing and The Narrows are renowned for being some of the most unique hikes in the country, Arches National Park‘s Fiery Furnace should definitely be included in that conversation. While indeed scenic, hiking Fiery Furnace won’t bring you to any breathtaking vistas. Rather, think of it like a maze that requires both problem-solving and physical agility to solve.
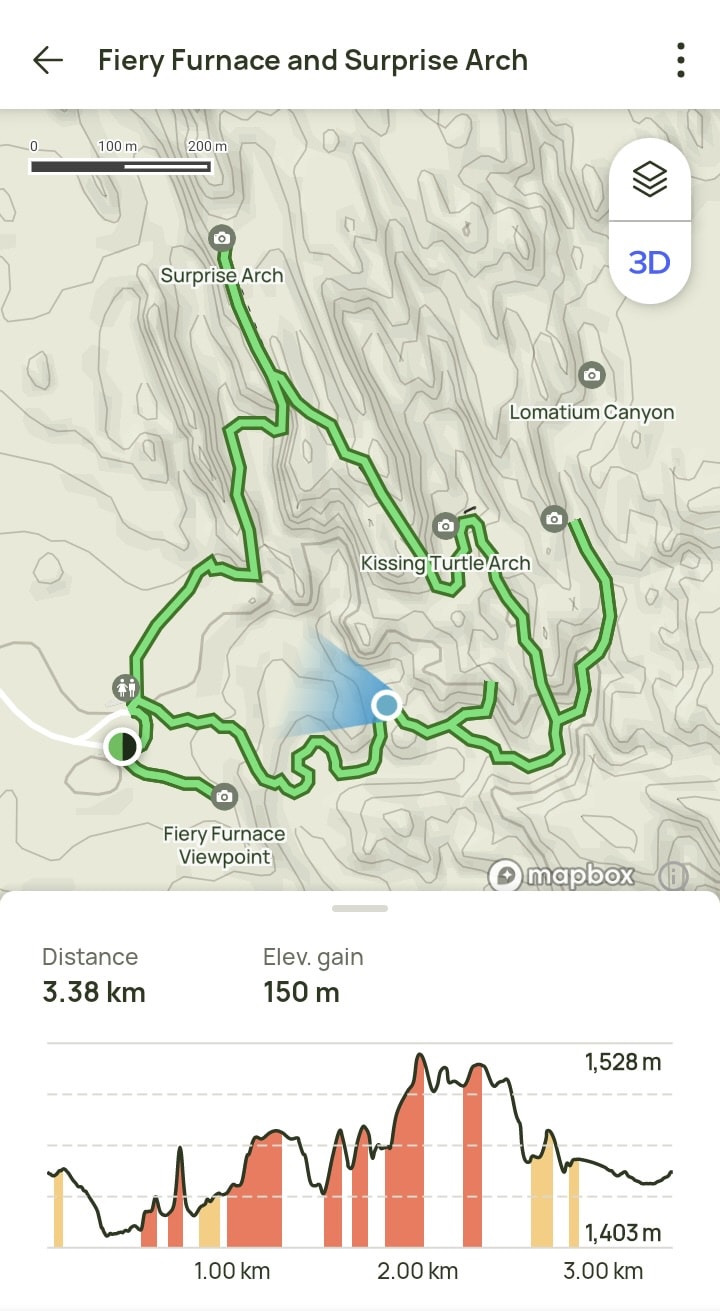
At only two miles long and with 500 ft of elevation gain, it might not sound like a big deal. But given the nature of the hike and the various obstacles you’ll encounter, it takes many people two-three hours to complete.
Expect to do lots of scrambling while also getting repeatedly lost. Scramble up the wrong set of large boulders, and you’ll have to carefully make it down the way you came once you realize your mistake.
A permit is required for everyone hiking Fiery Furnace, and you have the option of going with a ranger-guided tour or doing it independently.
In the following guide to hiking Fiery Furnace, you’ll learn everything you need to know, from the permit system to hike preparation to a detailed description of the hike itself.

About This Hike
THE BASICS: Hiking Fiery Furnace is probably going to be unlike any other hike you’ve ever done. Rather than a straightforward uphill climb, it entails navigating a natural labyrinth while overcoming various obstacles. Not only will you be testing your problem-solving skills, but you’ll also have to do lots of scrambling up and down large and slippery boulders.
As mentioned above, the full loop hike is just about two miles (3.4 km), but with everything you’ll have to overcome, expect the hike to take a few hours. In my case, after getting lost numerous times and taking detours to find every arch, I finished it in 2.5 hours.
Most people do the loop counterclockwise, but I did encounter one family doing it clockwise.
THE PERMIT SYSTEM: Hiking Fiery Furnace requires a permit that you can book at this link from seven days in advance of your hike from 8:00 MT. There are two types of permits: Ranger-Guided ($16) and Self-Guided ($10). If you’re hiking during the peak season, Ranger-Guided tickets can sell out within minutes!
After securing your reservation, you must appear at the Arches Visitor Center in person to pick up a physical permit – either the day before or the morning of your hike.
After confirming your details, you’ll be led into a separate room where you’ll watch this orientation video. Afterward, the ranger will give you a brief quiz to confirm that you were paying attention.
Now having done the hike, I can see why all these steps are required, as nobody should attempt this hike without knowing what they’re getting themselves into.
Presently, Arches National Park is implementing a timed entry system, though having a Fiery Furnace permit would eliminate the need for one on the day of your hike. Learn more below.
RECOMMENDED APPS: You can find the full trail outlined on AllTrails (‘Fiery Furnace and Surprise Arch’), which is extremely helpful if you’re hiking without a guide.
Despite a ranger having told me that the location wouldn’t be accurate and would show me ‘a few canyons away,’ my GPS location was indeed very accurate for most of the hike. But that didn’t mean that I always knew exactly which narrow opening I needed to walk through.
WHAT TO BRING: As with other hikes at Arches, you’ll want to have a sturdy pair of shoes, a hat, sunscreen and plenty of water. But despite its name, Fiery Furnace is a lot cooler than other parts of the park considering how it’s mostly shaded. As you’ll be doing lots of scrambling, you also don’t want to bring so much stuff to the point that your movement will be hampered.
You should also bring some plastic bags for waste disposal – whether for food waste or human waste. On that note, be sure to use the public restroom at the overlook before beginning your hike.
WHO SHOULD & SHOULDN’T HIKE FIERY FURNACE?: While not an exhausting hike in the traditional sense, Fiery Furnace is challenging and potentially dangerous in a lot of other ways.
You’ll have to carefully make your way down slippery and sometimes steep boulders. You’ll have to occasionally squeeze through tight spaces, and you’ll repeatedly get lost. This probably wouldn’t be a good hike for claustrophobes. And while the hike itself is mostly at ground level, those with a fear of heights might potentially struggle with the downward scrambling.
With all that said, I encountered numerous families with small children doing the hike, and it seems like small kids may actually have an easier time with the scrambling.
Hopefully, the detailed description of the hike below will give you a better idea of whether or not hiking Fiery Furnace is for you. If you’re interested but are still having doubts, it would be wise to book a Ranger-Led tour or at least visit with a larger group.
Hiking Fiery Furnace
Whether or not you’re actually hiking Fiery Furnace, everyone should at least come to visit the Fiery Furnace Viewpoint, for which no permit is required.
While it’s best to start the hike in the morning, the viewpoint looks best in the afternoon, so you may want to come back here on a different day.

As beautiful as the view is, it’s really hard to get a sense of what hiking Fiery Furnace is actually like from this overlook. But look closely and you’ll be able to spot a few of the trails that run through this stone labyrinth.


As detailed above, you’ll need to pick up a physical permit at the Visitor Center to proceed with the hike. While nobody actually checked for the permit during my visit, I was advised to tie the long rectangular paper to my backpack so that it would be visible from afar.

If you’re visiting with a Ranger-Guided Tour, there are normally two departure times: 9:00 and 9:30. You’ll still have to pick up your physical permit at least an hour in advance, and then you’ll all meet at the trailhead by the overlook.
If you’re hiking independently and starting in the morning, you should avoid tagging along with a Ranger-Guided Tour. You will, however, inevitably run into a group here and there, which will reassure you that you’re in the right place.
I ended up doing this hike solo. While I’d originally planned to do a Ranger-Guided tour, I was unable to snag a ticket in time.
Looking back, I’m glad things turned out the way they did, as going independently makes the overall experience more challenging but also more rewarding.


The hike begins with a fairly slippery descent down a narrow rocky path. This is only a taste of the challenges that lie ahead.
Once at the lower level, you’ll encounter a sandy trail and an arrow. Generally speaking, these arrows are few and far between and will only point you in a vague, general direction.
There will be plenty of instances where an arrow would be very helpful but you won’t find any. I imagine the rangers who set them up deliberately tried to leave the occasional helpful hint but without making things too easy.


With that said, I do recommend everyone hiking Fiery Furnace independently to download the AllTrails map in advance (you will need to pay for a yearly subscription – about $30 – to use it offline).
I personally didn’t feel like this was cheating, as the app is not going to let you know which specific canyon you should or shouldn’t head through. I still got lost plenty of times, but it was nice to have the app confirm that I was at least in the right general area.


In addition to occasional arrows, another type of sign you’ll encounter is one that reads ‘Dead End Ahead.’ Ordinarily, one would immediately turn around upon seeing such a sign. But don’t do so if you want to make the most of this hike.
Aside from simply completing the loop, a big part of the fun and challenge of hiking Fiery Furnace is finding all the interesting landmarks in the area, and a ‘Dead End Ahead’ sign is often an indicator that one is relatively near.


Near the beginning of the hike, I walked through a canyon and found myself in an area enclosed by towering sandstone walls and filled with numerous small caverns. A natural arch near the entrance, meanwhile, acted as sort of an entrance gate to this space.


It was one of the most photogenic areas I encountered at Fiery Furnace and it was well worth the quick detour. Next, I’d make my way back to the main trail only soon to make another intentional detour.


While there are plenty of interesting areas that lack an official name, when looking at the AllTrails map, you’ll find three arches that have been marked. And the first among them is called Skull Arch.
And so, where the trail forked, I made the relatively long detour in an attempt to find it.

This was my first major challenge of the day. Following what seemed to be an obvious path, I ended up encountering a dead-end. And the only way to proceed forward would be to scramble up a large and rather slick boulder.
Surely there would be some reward waiting for me on the other side, I figured. But despite my efforts to make it carefully up and over the boulder, I had no such luck. There was nothing in the area resembling an arch.


I then had to very carefully make my way down which was much worse than the climb up! And I certainly wasn’t the only one with the same idea, as I encountered a few other groups who’d come this way and found nothing.

Admittedly, I was about to give up on my hunt for Skull Arch. But as I started my return journey, I spotted a couple walking out of another narrow canyon that I’d previously passed by but didn’t think much of.
I asked them if they’d found Skull Arch and they confirmed that they had. I walked through that canyon, and in just a couple of minutes, I was looking up at the massive Skull Arch, arguably Fiery Furnace’s finest.

In total, Arches National Park is home to over 2,000 arches! And who knows if there are still more deep in the backcountry that have yet to be discovered.
In terms of arches, Fiery Furnace can’t compete with a trail like Devil’s Garden, but it does indeed have a few impressive arches of its own.

Back on the main trail, I proceeded onward with the loop, but things were far from straightforward. Aside from having to figure out which canyon to walk through, sometimes you will know where to go but you won’t know how to move forward.


For example, I encountered a large monolith and I started walking along the top. But I only reached a steep drop and wasn’t sure of the best way to proceed. While there was a narrow gorge off to the side, lots of rocks were blocking the way.
Other hikers were facing the same conundrum, so we all tried a different method until someone found the easiest way.
While I can’t remember all the details of every single obstacle, I remember once having to shuffle my feet across the edge of a monolith while leaning against the rocky wall, mainly relying on upper body strength to slowly get across.

About halfway through the main loop trail, you’ll walk past the Kissing Turtle Arch. And many people do indeed walk right past it without noticing, as it’s easily the smallest and least remarkable of Fiery Furnace’s three main arches.

Looking closely, you’ll observe that the formations on either side of the arch do indeed resemble kissing turtles. Notably, this is the only arch that doesn’t require traversing down a ‘Dead End Ahead’ path.


It was shortly after the Kissing Turtle Arch that I got lost again. None of the obvious-looking paths seemed to lead anywhere, and I had to backtrack repeatedly. Looking for a possible way out, I felt like I was lost in some sort of Legend of Zelda dungeon.


Sometimes, the least assuming path ends up being your only option to move forward. Though I’d encountered plenty of other people throughout the hike, I was alone here and had no choice but to experiment.
Spotting a steep, narrow and rocky opening, I decided to carefully make my way up to see what might be on the other side.


Sure enough, this turned out to be the correct path! But coming down the other side would be one of the most physically challenging parts of hiking Fiery Furnace.
Descending at a roughly 50-degree angle, I had to carefully put my weight on rocks of all shapes and sizes, many of which were loose.
Fortunately, taking things one step at a time, I managed to make it down without getting hurt or damaging my camera.

Next, I’d be taking another detour to head north to find the final main arch: Surprise Arch. But it would turn out to be just as difficult as Skull Arch.


I entered a spacious canyon with beautiful formations everywhere you look. But while the arch was supposed to be near, I didn’t see one. I then tried walking into some small slot canyons, but there were no arches inside of them either.
My phone showed me slightly east of where the arch was supposed to be, but I thought it was natural for it to be a bit off. But the app turned out to be surprisingly accurate for this section of the hike.
With no other options, I decided to backtrack south to see if there were any other canyon openings that would take me back north.


Sure enough, there was one, and it did indeed lead me to Surprise Arch. The name was quite fitting, as the arch appears suddenly and within a narrow space – basically the last place you’d expect to find a large arch!

Next, my goal was to head back to the main trail and make my way for the exit. At this point, the app showed me as being only about two-thirds done with the loop. But if you’re hiking Fiery Furnace counterclockwise, the labyrinth is pretty much over after you find Surprise Arch.
While there are still a few tricky parts, the final third of the trail is basically your normal hiking trail, taking you back through a wide, open space. As such, you’ll find yourself speeding through this part of the hike with relative ease.

Given its size, it’s possible to do every hike at Arches National Park in about a day and a half. And now having seen it all, Fiery Furnace was easily my favorite experience at the park.
While the reservation and permit system can be a bit of a hassle, those who are up for the challenge shouldn’t miss this one-of-a-kind hike.
Additional Info
At the time of writing, in order to prevent overcrowding, Arches National Park is implementing a timed entry system for the spring and summer. That means that you’ll only be able to enter the park with a Timed Entry Ticket, and you’ll have to show a screenshot of your pass upon entry.
Timed Entry Permits are NOT the same thing as park passes, but more like advanced reservations. They only cost $2 per day, but the key is buying them before they sell out.
Currently, passes are going on sale three months in advance. For example, those visiting the park at any time in June will be able to purchase a Timed Entry Ticket for that month beginning in March.
You can learn more about the system here, while this is the link for purchasing the Timed Entry Tickets. Note that if you fail to obtain a ticket, you can still enter the park without one either before 7:00 in the morning or after 16:00. And as mentioned above, you can enter the park at any time without a Timed Entry Ticket if you have a Fiery Furnace permit for that day.
Timed Entry Ticket aside, Arches National Park costs $30 per vehicle to enter (learn more here).
If you’re visiting from abroad, note that in contrast to many other countries, US parks typically charge per vehicle rather than per person. However, if you’re traveling by bicycle instead, they’ll charge you for an individual pass which costs $15, while those on motorcycles will be charged $25.
Considering how many National Parks and National Monuments there are to see in the Southwest alone, the best option for most will be to buy an ‘America the Beautiful’ Annual National Parks Pass.
These cost $80 for the year. In most cases, you’re already saving money by just visiting four National Parks/Monuments anywhere in the country within a full year.
What’s more, is that only one person in your vehicle needs to have the pass. Additionally, seniors can buy the pass for just $20. So if you have someone over 62 in your party, just have them get the annual pass and everyone else will be set.
As for where to get the pass, you can purchase it in person at most National Parks or Monuments. But you can also order it in advance online.
Considering how Moab serves as the base for two National Parks, one State Park and plenty of other nearby attractions, you’ll likely be spending at least several nights here.
Moab is one of the most touristy towns you’ll encounter in the Southwest, so there’s no shortage of accommodation options to choose from.
I stayed at a centrally-located motel called the The Virginian Inn Moab Downtown. Overall, I had a comfortable stay and consider it a good value.
The most peculiar thing about this motel is that the receptionists are located in the Philippines! There is someone on-call 24 hours, and you can start chatting with them via a video conferencing machine as soon as you enter the lobby. It felt rather strange at first, but the system actually worked out pretty well.
Other highly-rated accommodations for a similar price range include the Expedition Lodge, the Bowen Motel and the Rustic Inn.
Despite how popular it’s become, Moab remains relatively difficult to reach due to its geographical isolation.
The nearest major airport would be Salt Lake City, which is around four hours away. While Moab does have its own small airport, it apparently only has direct connections with Salt Lake City or Denver.
It’s also possible to take an Amtrak train from Salt Lake City to the nearby town of Green River, Utah. In any case, you’ll need to rent a car to get to Moab and explore the nearby parks.
For those doing a longer trip across Utah, Moab is about 2.5 hours from Capitol Reef National Park. If you’re coming from the Monument Valley area, Moab is about 2 hours and 15 minutes from the town of Mexican Hat.
Moab is also just about two hours from Mesa Verde National Park, Colorado.
Planning to do a longer trip through the incredible state of Utah? Be sure to check out our detailed Utah road trip itinerary. In addition to the Mighty 5, you’ll also learn about some amazing State Parks and National Monuments to stop at along the way.
And in regards to Utah’s Mighty 5, how does Arches National Park stack up against the others? You can find our rankings of the five parks here.