Last Updated on: 3rd March 2026, 11:37 am
Simply put, hiking up the Acatenango Volcano is one of the most thrilling adventures one can have in Central America. But as beautiful as Acatenango itself is, the real star of the show is its sister volcano, El Fuego, which erupts every 10-15 minutes. As such, it’s best seen after dark. In the following guide, we’ll be covering everything you need to know about the two-day Acatenango hike and exactly what to expect from the experience.
Hiking up Acatenango is one of Guatemala’s most popular excursions. But its immense popularity can mislead people about how difficult the journey really is. Keep reading to decide if this experience is really for you.
And for more information on booking a tour, what to pack, and general info about Antigua, be sure to check the end of the article.
About This Hike
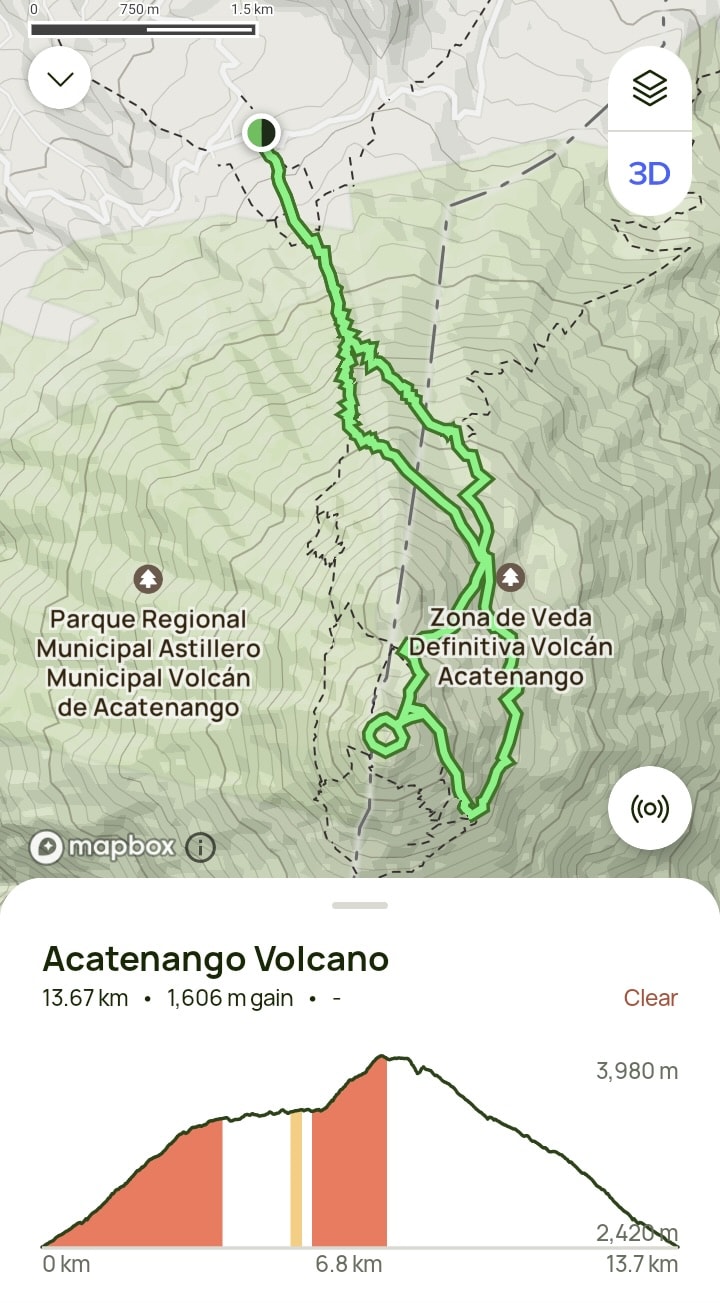
THE BASICS: Acatenango Volcano stands at 3,976 meters (13,045 feet) above sea level, making it Guatemala’s third-highest peak. Located just outside the city of Antigua, the volcano hike is easily the country’s most popular outdoor adventure.
While technically possible to do independently, a large majority of hikers go as part of a group tour. Not only will your guide ensure that you don’t get lost, but the tour company will also provide meals, essential items, and even lodging at the base camp.
That’s right – the full hike takes two days, and it’s best to think of it as having four main parts. The first and longest part is the hike up to the Acatenango base camp.
Acatenango is now dormant, but it has a twin volcano known as El Fuego, one of the region’s most active volcanoes. While you can see El Fuego erupting from the base camp, you can also go on an optional night hike about halfway up it. This will cost around 200Q on top of your basic tour price.
The third phase begins early the next morning, and it involves climbing to the peak of Acatenango itself for sunrise. And then comes the long descent.
Learn more details about booking a tour and how much you can expect to pay at the end of the article.
HOW DIFFICULT IS THE HIKE?: Researching the Acatenango hike online, you’ll find comments that say ‘This was the hardest thing I’ve ever done in my life.’ Other people, meanwhile, might say something like ‘I did it hungover and it wasn’t really that hard. I’m not even an experienced hiker.’ So hard is this hike?
The hike is indeed very strenuous, as it’s an uphill climb the entire way. You’ll also be carrying all of your things with you. But the main challenge will be the altitude.
I imagine that when it comes to a hike like this, a non-experienced hiker who’s not affected at all by the altitude will have a much easier time than an experienced hiker who is. Altitude is something that affects everyone differently, but there’s no way of really knowing until you’re in the thick of it.
If you’re really having doubts, it’s possible to hire a porter to carry up your things for you. You may also want to purchase pills for altitude sickness in advance. Also note that while some people do all three sections of the hike, lots of people just hang around at base camp until it’s time for the final descent. Don’t feel guilty about making the base camp your primary goal.
Hopefully, the following guide will help you decide if you’re really up for the Acatenango hike. If not, you may want to opt for the shorter Pacaya hike, also near Antigua.
WHAT TO BRING: As this is an overnight hike that can get very cold at the top, preparation is key. Some basic items will be included as part of your tour, while you’ll also have the option of renting things like a headlamp and trekking poles.
At the end of the article, you can find a detailed packing list to ensure you won’t forget anything – or bring too much!
The Ascent to Base Camp
On the morning of my tour, a bus picked me up from my accommodation at around 9:20. We were then driven to another part of town where we boarded a bigger, more crowded bus.
It was here that we paid in advance for entry to the National Park (100Q), plus the fee for the optional El Fuego hike (200Q). The staff assured us that we’d get a refund if we were to later change our mind about El Fuego, though everyone would end up going.
It was also here that we were given the items included in our tour package: a winter hat, gloves, a thick jacket, and two liters of water, in addition to that day’s meals.
For whatever reason, I’d been under the impression that we’d be getting these items later, and had not anticipated hiking up with everything from the very start.

It was also on the bus that we were offered the chance to rent certain equipment if necessary, such as trekking poles (25Q), a headlamp (50Q), and a large backpack (75Q). Be sure to check our detailed packing guide below.
We were then driven to the starting point of the hike, roughly 45 minutes out of town. Our group consisted of eighteen people and we’d be accompanied by three guides.
Be sure to remember the name of your group, especially at the beginning when so many people start around the same time. Your guides likely won’t speak English, though there’s a high chance of having some bilingual people in your group.

Before the hike began, our guides explained that we’d be stopping every 30-40 minutes to rest for about 10-15 minutes. And in total, the hike up to the base camp could take 4-5 hours depending on the speed of the group.
Ultimately, however, it would end up taking us over six!


If you’ve done any volcano hikes in the past, you’ll know that they immediately begin at a fairly steep incline. And it never gets easier until the very end.
In total, the Acatenango hike has an elevation gain of around 1500 m (5150 ft). While the altitude is obviously more of a concern the higher you go, unless you live in the mountains, you’re still going to be feeling out of breath in the early stages.


Fortunately, there will be plenty of stops near the beginning. The early portions of the hike feature several different ‘rest areas,’ complete with food stands and bathrooms. The higher you go, the pricier things get, though I still found prices to be reasonable.
I only ended up purchasing one item, which was a small bottle of Gatorade for 25Q – not much more than what some shop owners in Antigua might try to charge foreigners!
Eventually, at one of these rest areas, your guides will tell you to sit down for a while and take out the lunch they’d given you that morning. Lunch turned out to be later than I expected, and I was glad I’d eaten an early breakfast at my guest house.


I normally like to hike alone or with just a few other people. But I was glad I was hiking Acatenango with a group for a number of different reasons.
First of all, as this is a nonstop uphill climb, hiking with a group puts peer pressure on everyone to keep going. If I was by myself, I know I would’ve taken a lot more breaks. (With that said, if you’re on the slower side, your guides aren’t going to leave without you.)
As is also typical with volcano hikes, a large majority of the hike is spent beneath the tree line. As there aren’t really any interesting viewpoints until you reach the base camp, chatting with other members of the group is a good way to pass the time.

It was a foggy day during my hike, and visibility just kept getting worse the higher we went. ‘What if we hike all the way up and don’t even get to see the volcanoes?’ we asked each other. That’s a possibility you’ll have to be prepared for when deciding whether or not to do this hike.
But as the hours progressed, all I could think about was having a rest at base camp. I was growing more and more fatigued due to the altitude, with my heart pounding hard in my chest.


Eventually, we reached the official entrance to the National Park (which we’d already paid for that morning). But we still had a while to go before base camp. Fortunately, the final segment leading to the camp gets slightly flatter.
We finally arrived at base camp at around 17:30 or so. Regarding sleeping arrangements, I’d been expecting regular tents, but they turned out to be semi-permanent structures.
And each one fit no less than five people! But considering how cold it gets at night, it’s not quite as bad as it sounds.


After setting down our stuff at basecamp, we soon had to make a choice about whether or not we wanted to do the additional El Fuego hike. Visibility was pretty much zero, and our guide even told us that there’d be a high chance of not seeing anything.
But as exhausted as we all were, most of us didn’t want to feel like we’d made it all this way for nothing. And in the end, nearly everyone from our group joined the additional El Fuego hike.
The Hike to El Fuego
While it wasn’t clear to me at the time of our arrival at base camp due to all the fog, you’re normally supposed to get a clear view of El Fuego erupting right from the camp.
And as I’d later realize, nearly all of the impressive shots of the nighttime eruptions are taken from base camp – NOT from the final viewpoint of the ‘El Fuego hike.’ We’ll be getting into why this is shortly.

By this point, most of us were complaining of exhaustion and physical pain from carrying our heavy bags all day. But at least we could leave our big bags at base camp for this extra excursion.
The hike begins with a descent (though not via the same trail we’d just hiked up), followed by a brief flat area in between the two volcanoes, followed by a steep ascent up El Fuego.

As mentioned, visibility was very poor when we set off for the hike, but the fog occasionally cleared up for brief moments. This not only gave us some hope, but it also revealed what another tough climb we had ahead of us.
But the fog rolled in once again, while it grew increasingly cold and dark. And we even encountered some hikers coming down who told us that they weren’t able to see a thing. So we began to lose hope once more.


We made repeated stops during the ascent up El Fuego, during which our guide would talk with other guides over walkie-talkie. Overhearing their conversations, it seemed more and more likely that we wouldn’t see anything.
Still, we kept on climbing until we were almost near the top. We stopped here for quite a while, and none of us knew why. But we later realized it was because we were waiting for another group to return from the main viewing area.
It was now completely dark. And all of a sudden, through the thick fog we could see a large group coming our way with lanterns and flashlights. We could barely make out their faces, and it resembled a scene out of a creepy sci-fi movie.


But then, the next thing we knew, we looked in the distance and saw an eruption! Miraculously, the fog had cleared up entirely just as we arrived at the viewpoint – not just here but across the entire area.
We all felt extremely lucky, and we were glad to have followed through with the hike. Next, we just had to stand and wait patiently for the next eruption.
Obviously, the El Fuego hike doesn’t take you all the way up to the peak of this active volcano, but roughly halfway up the mountain. From here, you can safely enjoy clear views of the volcano spouting lava.


Eruptions seemed to occur every 10-15 minutes or so. And we’d end up seeing five or six eruptions from up close before heading back.
It was an incredible experience, but far from a comfortable one. It was very cold and extremely windy in this area. Even if you have a tripod, don’t bother using it here, as no tripod could withstand such extreme winds.
That’s why pretty much every long exposure shot you’ve seen online was taken from somewhere near the base camp, as it’s much less windy there.

Regarding photography, this is a situation for which you’d actually be better off using your smartphone camera and some of its fancy automatic settings rather than a DSLR in manual mode.
While I tried my best to get some shots of the eruptions in such a dark and windy environment, I’d actually recommend serious photographers to consider skipping the El Fuego hike, as the base camp is the only place from which to take long exposure shots.
I could’ve tried to take some more stable shots upon our return to camp, but I was much too exhausted by that point to think about photography.
In any case, I was still happy to have seen the eruptions in person from fairly close.

The hike back to base camp was just as tough as everything else we’d done that day. We finally made it back at around 9:00 or 9:30, and only then was it time for dinner. We’d all received some pasta that morning, which we put into a big pot for our guides to heat up for us.
After dinner, I immediately went to bed, not even bothering to change clothes. Everyone else did the same.
The next morning, we’d have to wake up no later than 3:45 in time to start our next hike beginning sharply at 4:00.
Hiking to the Peak of Acatenango
Someone came around to wake us up at 3:45, though it’s best to set your alarm. I later met some people who told me their guides nearly left them behind!
Again, you can leave your larger bag at base camp for this hike, which is why bringing along an additional smaller bag is essential.
As mentioned, our group consisted of eighteen people, but only ten of us bothered to get up early for the final ascent. And early on into this hike, three people would quit and turn back.

Admittedly, I was close to doing so myself. We were all sore from the previous day, not to mention sleep-deprived. To top it all off, the altitude really started to get to me during this final hike, with my heart feeling like it was going to jump out of my chest.
Luckily, our group was somehow last behind several other groups. And this meant we had to make regular stops to wait for the others to get further ahead. And this is what saved me, as the frequent short breaks allowed me to catch my breath.
Though relatively short, the hike up to the peak of Acatenango is the steepest hike of the entire journey, starting with a climb up through scree and loose rocks.


We eventually reached a flat section, though it was followed by an even steeper and sandier part. It was quite literally a ‘Two steps forward, one step back’ situation, and we needed to expend a lot of energy for just a little bit of progress.
Finally, we got to a regular rocky portion which, while steep, was a lot easier to climb. And then finally, we made it. The total ascent took a little over an hour, though it felt like much longer.

The sun had already mostly risen by the time our group arrived, but it didn’t really matter. The views in every direction were spectacular, especially now that the fog had totally cleared.


From the top of Acatenango, you can also enjoy watching more eruptions of nearby El Fuego. But under the light, you won’t be able to see any lava – only large plumes of smoke.

Other landmarks, meanwhile, include the Volcán de Agua – also near Antigua – and even the various volcanoes which surround Lake Atitlán! This surprised me, as I never imagined it would be possible to see that far.


As with the end of the El Fuego hike, it was extremely windy at the top of Acatenango Volcano. And even while wearing gloves, my hands were growing numb.
Eventually, it was time to head back to base camp. And though I was dreading this descent, it was much easier than I expected. The little rocks here are so loose that you can basically slide down much of it!


Furthermore, we were able to take an even steeper and sandier shortcut that would’ve been too difficult to use on the way up. In the end, the descent was much faster and easier than the climb up.


Back at base camp, it was time for breakfast before the final descent to the starting point. Breakfast consisted of simple egg sandwiches, and our guides even had some coffee for those who requested it.

For whatever reason, our guides had told us the previous night that we’d only have ten minutes after eating breakfast to get ready for the final descent. But this did not turn out to be the case at all, and we’d end up having about 45 minutes.


The final descent went mostly as expected. While not nearly as tiring as the way up, you’ll definitely want trekking poles if you ever experience knee pain when walking downhill.
I think all of us slipped at least once, though fortunately nobody got injured.


The total descent took a few hours, and we made it back to the highway around noon. We returned our stuff, got in the bus, and arrived back in town at around 12:30.
Conveniently, the bus driver drove around Antigua to drop everyone off at their accommodations.
I relaxed the whole afternoon, and I was also very glad to have included an entire extra rest day the day after my Acatenango hike!
Additional Info
Booking your Acatenango hike is very easy and surprisingly affordable. The easiest way to do so is to just book online. I booked this tour, which is both one of the cheapest options and also one that has lots of positive reviews.
At the time of writing, the two-day tour goes for just $46 USD. But as mentioned above, you’ll also have to pay an extra 100Q (about $13 USD) to access the volcano, in addition to 200Q for the optional El Fuego hike. So that nearly doubles the total cost.
I felt that everything went smoothly with my tour and was happy with the way things turned out overall. While communication could’ve been better at times, the guides were generally friendly and helpful, and there were no major unpleasant surprises.
Another way to book your hike is either via a tour agency in town or through your hotel or hostel. For what it’s worth, I was discussing the Acatenango hike weeks later with another traveler I’d met. She said she booked with a particular tour agency in Antigua whose base camp is known for having the best views of El Fuego (unfortunately, I can’t recall the name).
But she also complained that the tour overall was very poorly run, with rude guides who’d often threaten to leave people behind. Hearing this, I’m glad I booked through GetYourGuide.
As mentioned above, items that will likely be included for free as part of your tour include jackets, hats, gloves and two liters of bottled water. You will also find a sleeping bag ready for you at base camp.
Additionally, you should be able to pay extra to rent the following items: trekking poles (25Q), a headlamp (50Q), and a backpack (75Q).
With that in mind, what follows is a list of things you’ll want to bring for this hike, in no particular order:
- Basic toiletries that you’d normally take for an overnight stay, along with things you’d normally take on a long hike, such as a hat and sunscreen.
- Water: As mentioned above, two liters of water will be provided for you, but you’ll still want to bring one or two more. If you’re worried about too much water weighing you down, you can also purchase some beverages during the ascent.
- Snacks: While basic meals are provided, you’ll definitely want to pack some of your own snacks. In Antigua, a good place to go is the La Bodegona supermarket in the western part of the city.
Hand sanitizer: You won’t be able to wash your hands with regular soap and water throughout this hike.
Face wipes/wet wipes: Unfortunately, I was unable to find these in Antigua, but you’ll end up returning from this hike with your face covered in black ash!
Toilet paper: Don’t expect to find toilet paper during this journey, so come prepared with your own.
Warm clothing: As mentioned, the tour company will provide you with a jacket, but you’ll still want additional layers that you can put on or peel off throughout the Acatenango hike. I found the provided jacket to be too bulky to hike in and only wore it at base camp.
Ibuprofen: I don’t normally take ibuprofen, but borrowed some from a fellow hiker. Given how sore I was from the first day of hiking, this really helped during the descent.
An extra smaller bag: Considering how you can leave your bigger bag behind at base camp during the El Fuego and sunrise hikes, you’ll definitely want an additional smaller bag to bring with you during those hikes.
Good hiking shoes: You’ll have a very tough time without them. Some people in our group climbed in basic Converse sneakers, and they repeatedly slipped and fell. I currently hike in these lightweight hiking boots by La Sportiva which are quite comfortable.
Trekking poles: As mentioned above, you can rent them from your tour company, but it’s worth traveling with your own poles if you do a lot of hiking in general. These poles by Trekology are highly rated and seem to often go on sale.
Dry bag: Come prepared with a dry bag or at least some regular plastic bags in order to protect your things in case of rain.
Battery pack: You will have no way to charge your phone, so bringing an external battery pack is a must – especially if your smartphone is your main camera. This is one of the most affordable power banks out there and it goes for a very reasonable price.
Headlamp: This is another thing you can rent, but it’s well worth having your own headlamp during your travels. While not the cheapest option out there, I’ve been using a Black Diamond headlamp for the last couple of years, and it still works great.
By staying within the historical center, all of the top things to do in Antigua will be walkable. While it might be tempting to save a bit of money by staying in Antigua’s outskirts, it’s well worth splurging a bit to stay somewhere central. But there are indeed some budget options in the center to choose from.
Popular budget-friendly hotels in the heart of the city include Hotel La Sin Ventura and Hotel De Cortez y Larraz.
Those looking for something a bit fancier should consider Hotel y Arte Antigua or Posada San Sebastian.
And for those without much concern for their budget, Hotel Las Farolas and Hotel Aurora are some of the highest-rated options.
Antigua is situated just next to Guatemala City, so many travelers fly into the capital before immediately heading there. The journey could take up to an hour depending on traffic.
While Guatemala City is indeed worth checking out for a day or two, those coming directly from the airport can take a taxi. But a more hassle-free option would be to book a pre-arrange a shared shuttle in advance.
But what about coming to Antigua from elsewhere in the country? Generally speaking, when traveling around Guatemala, you’ll want to take special tourist shuttles. Guatemala and most Central American countries lack the convenient and comfortable coach buses that you’ll find throughout Mexico. While coach buses do exist, their routes are extremely limited.
That leaves ‘chicken buses’ (the nickname for local buses that are converted American school buses) as the only public transport option in many cases. But if you’re looking for a relatively comfortable and direct ride to your destination, a shared tourist shuttle is the way to go.
While pricey, these can save you a lot of time and stress. Multiple companies exist throughout the country, but I can recommend Adrenalina Tours. I used them multiple times, including from Flores to Antigua (a 12.5-hour journey!) and from Antigua to Panajachel, among other trips. Communication was always smooth and I always reached my destination without issues.
But if you’re still determined to take a chicken bus to Antigua, you’ll arrive at ‘La Terminal’ to the west of the city center. Personally, I think chicken buses are fine to take for day trips. But if you’re traveling with a lot of luggage or valuable items, I’d think twice.
Some chicken buses might have plenty of storage space above the seats or a system in place to put your things on the roof. But in other cases, you may have to bring everything to your seat with you. And sometimes, the buses can get so full that three people will squeeze into a single seat!
Furthermore, you’ll often have to transfer multiple times, even if your destination may appear quite close on a map.