Last Updated on: 29th May 2025, 08:19 am
The Chasm Lake hike is one of Rocky Mountain National Park’s most popular longer hikes. Hikers can enjoy beautiful views of the alpine tundra along the way, while Chasm Lake itself is the best place to view Longs Peak – the park’s highest point – from below.
In the following guide, we’ll be covering everything you need to know about the hike to Chasm Lake, including its notorious parking situation.
And for more general information about Rocky Mountain National Park, where to stay in the area, and the park’s Timed Entry Permit system, be sure to check the very end of the article.
About This Hike
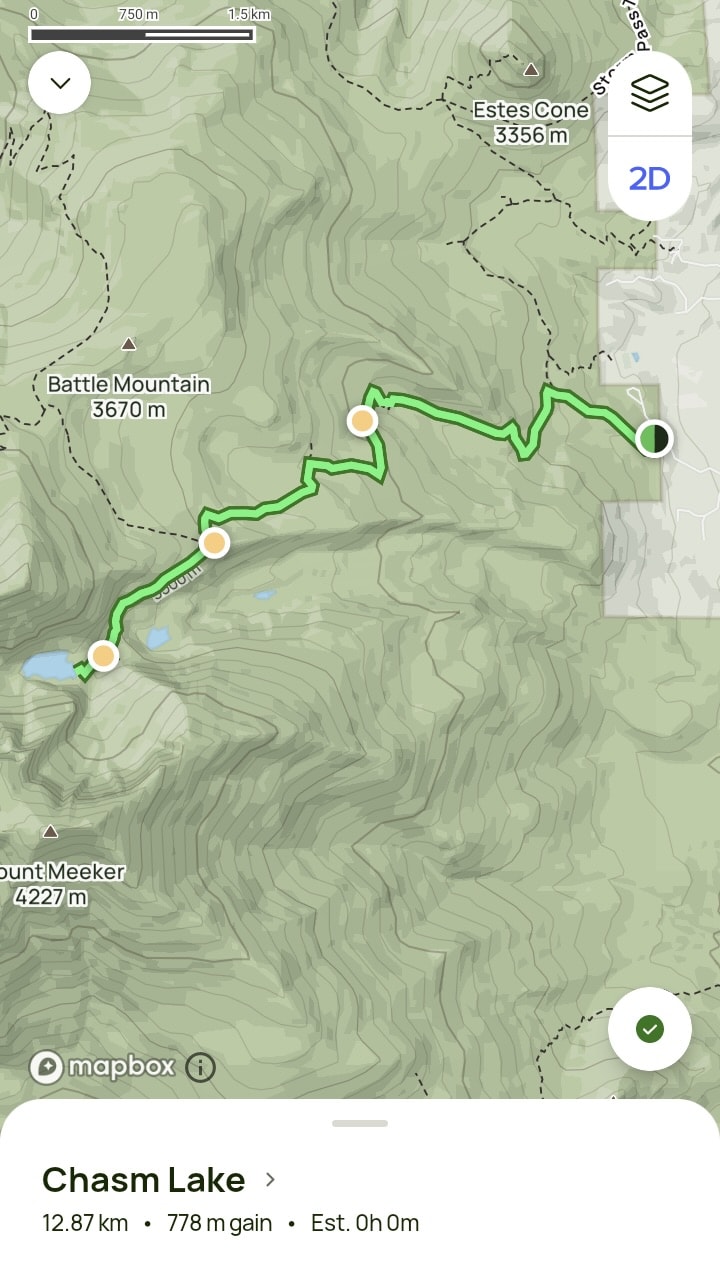
THE BASICS: The hike to Chasm Lake is an out-and-back hike that stretches out to about 8 miles (12.87 km) and with a total elevation gain of 2,552 ft (778 m).
Not only is this a strenuous hike on its own, but it brings you up to an elevation of 11,760 ft (3584). As such, those coming from lower elevations will definitely want to do one or two warmup hikes before attempting this one.
The Chasm Lake hike is mostly straightforward, though you will encounter a challenging rocky section right at the end of the hike for which some scrambling is required.
Note that this hike shares a trailhead – and much of the trail itself – with the hike up to Longs Peak, the park’s highest point. As a result, you’re not going to be able to find a parking space in the main lot. Keep reading to learn more about the parking situation.
All in all, my hike to Chasm Lake and back (including rest time) took me about 4 hours and 45 minutes in total.
WHAT TO BRING: You’ll definitely want to wear proper hiking boots or trail runners, as the hike can get very rocky.
Trekking poles are also a great idea, though I’d only recommend bringing one so that you’ll have a free hand for the final scramble.
Of course, you’ll also want to bring snacks, plenty of water, a hat, sunscreen and a camera.
RECOMMENDED APPS: You can find the full hike outlined on AllTrails, though you’ll need to pay for a subscription and download the offline version in advance.
Otherwise, the free offline map app Organic Maps should come in handy as well.
STAY SAFE: Rocky Mountain National Park is known for its afternoon thunderstorms that can occur suddenly, especially from around noon to 3 pm.
Therefore, when doing long and strenuous hikes that take you above the tree line, it’s imperative that you get an early start. It’s generally recommended that you’re at least back beneath the tree line by noon or 13:00.
Parking for Chasm Lake
Aside from the hike itself, one of the main things you need to prepare for when hiking to Chasm Lake is the parking situation. As mentioned above, Chasm Lake shares a trailhead with the hike to Longs Peak.
On Google Maps, look up the ‘Long Peak Trailhead’ which is located south of Estes Park. First, head down Hwy 7 before turning onto Longs Peak Rd.


As mentioned above, it’s imperative that hikers be back below the tree line by afternoon. As such, those hoping to conquer Longs Peak, which is a 10+ hour hike, arrive here in the middle of the night to start their hike. And the main parking lot is said to fill up as early as 2:00 am!
If you’re simply hoping to do the Chasm Lake hike, arriving in the middle of the night would be ridiculous. Fortunately, there is a solution.


What most people do is park alongside the road. So many people do this, in fact, that upon my 7:00 arrival, the nearest spot we could find was a good ten minutes on foot from the parking lot. With that said, you still want to get to the area quite early.
Parking can be tricky, as there are sometimes ditches alongside the road, and you’ll want to avoid getting your car stuck. But you should be fine as long as you’re careful.
As far as I can tell, parking along the road is fine, and with so many people doing it, you shouldn’t have to worry about getting a ticket.
The Chasm Lake Hike

Beginning my hike around 7:15, I entered the forest via the trailhead near the parking lot. The first hour or so of the hike is below the tree line and rather unremarkable.
Considering how many cars I’d just seen lined up alongside the road, I was surprised to have this portion of the trail mostly all to myself. It seems that a majority of people do indeed hike all the way to Longs Peak.


Once above the tree line, the Chasm Lake hike starts to get a lot more interesting, as you’ll get to see the distant mountains and the sprawling tundra.
Rocky Mountain is known for its unpredictable weather, but I was extremely lucky with the weather this day, and there wasn’t a cloud in the sky.


At the time of my visit, teams of park rangers were laying down stones to be part of a new trail. Supposedly, the trail here used to be so rough and rocky that many hikers would avoid it altogether, instead walking parallel to it.
But that resulted in damage to the precious alpine tundra. And so, the trail has finally been made flat enough to keep hikers on it.

Though I’d encounter a few more hikers above the tree line, I was still surprised to have this vast wilderness area mostly to myself.
As this was my third long hike at Rocky Mountain, I was already acclimated to the altitude and didn’t find this part of the hike to be particularly tiring.
But as mentioned above, this is not a hike you’d want to try as your very first if you’re coming from a lower elevation.


As you hike along this portion of the trail, you’ll repeatedly find yourself stopping to enjoy the 360-degree views. Having just hiked to Sky Pond the previous day, it was a big change of scenery to be hiking through such an expansive and open environment.


Eventually, you’ll come to the junction where the Chasm Lake hike and the Longs Peak hike officially split. Be sure to take the correct trail, as the Longs Peak trail would take you up to an elevation of 14,259 ft!


Near the intersection, you’ll find some large boulders on which you can rest, while there’s even a primitive bathroom off in the distance. You will actually encounter yet another restroom before the final scramble.


Before my trip, I’d heard some people compare the Chasm Lake hike to the Grinnell Glacier hike at Glacier National Park. But thus far in the hike, I really couldn’t understand why.
But once I started the final quarter of the hike, I began to see the similarities.


The final stretch of the Chasm Lake hike has you walking along a ridge as you overlook a lake, officially known as Peacock Pond, and a waterfall, known as Columbine falls. The scenery here is almost identical to the end of the hike to Grinnell Glacier.
All in all, however, the Sky Pond hike, with its ever-changing scenery, reminded me more of Grinnell Glacier, which is one of my all-time favorite hikes.

While not yet visible, Chasm Lake itself is situated right below the mountain peaks you’ll be staring at from a distance. But there are still a few more major obstacles you’ll have to overcome.


Finished with the ridge, you’ll encounter a large grassy meadow. And it can be hard to tell exactly where the trail leads, as you’ll see nothing but a massive monolith.
And as you get closer, it’ll become clear that you have no choice but to climb and scramble up the rocks in order to make your way forward.


While I’d read about a scrambling section before my hike, the articles I’d come across made it seem like not such a big deal. And considering how I’d just completed Sky Pond’s infamous waterfall scramble the previous day, I approached this section with little worries.
But as I’d soon discover, this portion of the hike turned out to be a lot trickier and challenging than I’d anticipated.

At the start of the large rocky area, you’ll find a sign indicating where you’re supposed to begin. And at this point in my hike, there were a few other hikers in front of me, so it was helpful to observe the route they took.
But I didn’t always follow them, and often just chose the way that appeared easiest. There’s no single correct way to make it up here, it seems.
As you will need to use your hands at certain points, it would be wise to only bring one trekking pole instead of two.


The higher I got, the less clear things became, and I just had to wing it and hope for the best. As long as you’re consistently getting higher and not slipping, you’re doing things right.
But before enjoying the lake, it would be wise to turn around and make a mental note of how you got there which should make things easier for the return trip.


Finally, after roughly 2.5 hours of hiking, Chasm Lake came into view. To get closer to the lake, you’ll still have to walk over uneven and rocky boulders, though nothing as bad as the final climb up.


The highest point you can see opposite the lake is Longs Peak, though I wasn’t able to spot any hikers up there. It looks like it would be a daunting yet unforgettable hike.
Despite only encountering a handful of other hikers on the way up, I arrived to find several hikers already at Chasm Lake, relaxing by the water.


After eating some snacks, resting my legs, and walking around a bit to see the lake from various angles, it was finally time to begin my descent.
Unfortunately, I did a really poor job at remembering where I’d climbed up. And the main rocky portion looked quite different from above.

When looking down, the easiest way to descend seemed to be over to the left. But it turned out to be quite tricky, involving lots of sliding on my butt, and having to put my weight on large rocks that weren’t always completely stable.
I quickly realized that this was not at all the way I’d come up, and ascending this way would’ve been very difficult. Nevertheless, by taking things one step at a time, I managed to make it all the way down, and it wasn’t long before I spotted the main trail.


Back on the main trail, the hike down was rather unremarkable, but the sky was luckily still clear. I encountered many more hikers during the descent and was surprised by how many people were just beginning their hike after 11:00.
As mentioned above, you want to be below the tree line already by around 13:00. But to be fair, there was a 0% chance of rain forecasted for this day, and it would indeed remain dry.
With that said, I’ve heard stories of people hiking in Rocky Mountain on what were supposed to be perfectly clear days, only to encounter sudden afternoon showers. As such, it would still a good idea to start as early as possible.

It was around noon by the time I made it back to the parking lot, after which I had to walk another ten minutes or so down the road to reach the car.
All in all, Chasm Lake was a rewarding and enjoyable hike. But if I had to rank all the long hikes I did at Rocky Mountain National Park, the Chasm Lake hike was probably the least remarkable.
If you have limited time at the park, I’d go with Sky Pond or Mt. Ida first. In any case, be sure to acclimatize yourself beforehand with a slightly easier hike.

Additional Info
Presently, Rocky Mountain National Park is implementing a Timed Entry Permit System during the peak summer season (specifically May 24 – Oct 24) to reduce overcrowding.
Compared to many other National Parks, however, this system is a lot more flexible, as it’s only in place from 9:00-15:00.
However, if you plan on doing any of the hikes along Bear Lake Road, you’ll need to reserve a special version of the permit known as Timed Entry + Bear Lake Road. These permits are required to access Bear Lake Road from as early as 6:00, so they’re especially important to obtain.
From my experience, compared with securing permits for Glacier National Park, I had no issues getting all the permits needed for Rocky Mountain on the day they went on sale. Still, it would be wise to purchase them as soon as possible so you don’t experience any major disappointments.
You can purchase the permits online here.
Both versions of the permit go on sale on the first day of the month before the month you plan on visiting the park. For example, if you plan on visiting any time in August, Timed Entry Permits for that month will go on sale on July 1.
The most convenient base for Rocky Mountain National Park is the town of Estes Park, located just to the east. Most of the park’s significant hikes and landmarks are also located in the east of the park, so staying in Estes Park would allow you to get an early start.
Furthermore, it’s quite a charming town with plenty of restaurants and amenities to choose from. However, in regards to hotel prices, the town is far from budget-friendly.
Popular mid-range options include Olympus Lodge and Coyote Mountain Lodge. Those with bigger budgets might want to consider private lodgings such as the Fall River Casita or Old Man Mountain.
But if Estes Park is out of your budget, what are the next best options?
One option is the town of Lyons, which is about 30 minutes southeast of Estes Park. I originally booked a hotel here, but had to cancel due to a slight scheduling alteration. I did drive through Lyons at one point, and while it seems like a fine base, it does seem a bit lacking in terms of restaurants and shops.
Ultimately, I ended up staying in the city of Loveland at the Travelodge by Wyndham. The positives of Loveland are that it’s a sizable town with plenty of hotels, shops and restaurants to choose from. And the hotels are surprisingly affordable.
The main downside is the distance from the park. Each morning, we had to drive through a scenic yet winding canyon, with the journey to Estes Park lasting nearly an hour, not to mention additional driving to that day’s trailhead. Nevertheless, it was still nice to be able to stay near Rocky Mountain for such a cheap price.
As mentioned above, the town of Grand Lake is just outside the southwest boundary of the park, and it seems to be a lot more affordable than Estes Park. But with the exception of a hike like Mount Ida, using Grand Lake as your base would mean you’d have to do a lot of driving each day – mainly down Trail Ridge Road. As thrilling as that road is, it’s probably not something most visitors would want to have to deal with daily.
At the time of writing, Rocky Mountain National Park costs $30 per vehicle per day, or $35 per vehicle per week (learn more here).
US National Parks parks typically charge per vehicle rather than per person. However, if you’re traveling by bicycle instead, Rocky Mountain will charge you for an individual pass which costs $25, while those on motorcycles will be charged $30.
Considering how many National Parks and National Monuments there are to see in the Southwest alone, the best option for most will be to buy an ‘America the Beautiful’ Annual National Parks Pass.
These cost $80 for the year. In most cases, you’re already saving money by just visiting four National Parks/Monuments anywhere in the country within a full year.
What’s more, is that only one person in your vehicle needs to have the pass. Additionally, seniors can buy the pass for just $20. So if you have someone over 62 in your party, just have them get the annual pass and everyone else will be set.
As for where to get the pass, you can purchase it in person at most National Parks or Monuments. But you can also order it in advance online.