Last Updated on: 12th October 2024, 05:35 pm
Spreading out to nearly 800,000 acres, Joshua Tree National Park is the place where the Colorado and Mojave deserts converge. Millions of visitors flock to this harsh desert environment each year to admire its uniquely shaped granite boulders and of course, Joshua trees, a species of yucca. In this Joshua Tree guide, we’ll be covering the top hikes you can experience in a couple of days at the park.
The following guide is presented in the order I visited each site, but everything’s also been divided up geographically. If you only have a day in the park, these are the essential hikes I would focus on: Hidden Valley, Wall Street Mill, Ryan Mountain and Fortynine Palms Oasis.
For more information on reaching Joshua Tree and the best places to stay, be sure to check the very end of the article.
Joshua Tree Guide Contents
Navigating the Trails
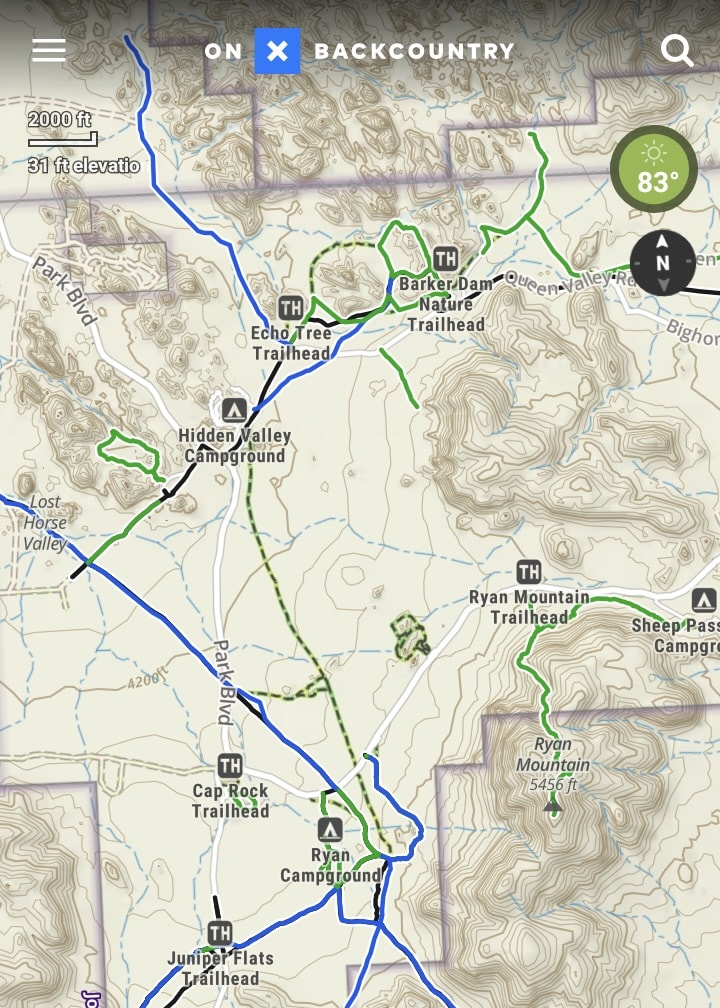
Most of Joshua Tree lacks reception, so it’s vital to download trail maps in advance that you can later access offline. The app onX Backcountry is a great option for this, and it costs just $30 per year for offline access.
AllTrails is another popular choice. But a major advantage of onX is that it’s much easier to see where all the trails are in relation to one another, which is incredibly helpful for trip planning and getting around.
While I have extensive experience with AllTrails, it only lets you view a single trail outline at a time, which can result in a lot of confusion due to there being so many variations of certain hikes.
South Joshua Tree
The southern part of Joshua Tree is the most remote section of the park that can be accessed by visitors. It’s served by the Cottonwood Visitor Center and has a few interesting trails to experience.
If you’ve previously visited Anza-Borrego Desert State Park and/or the Mecca Hills Wilderness area, this is where you’ll first enter the park. And if you’ll either be entering or leaving this way, it’s well worth trying the Mastodon Peak trail.
With that said, if Mastodon Peak is too much of a detour, the central part of Joshua Tree National Park has more than enough to occupy your time.
Mastodon Peak
Mastodon Peak is a 1.4-mile (4 km) loop trail should take you about an hour. Like many of the hikes in this guide, it’s generally regarded as moderate. The hike begins at Cottonwood Spring, one of the park’s many oases.

Oases are the result of groundwater reaching cracks in the Earth’s crust and then rising to the surface, eventually resulting in the growth of fan palms.
Before the modern era, Cahuilla Indians lived in this region for thousands of years, and archaeological evidence suggests that they were well aware of oases like these.
More recently, local miners pumped water from Cottonwood Spring to supply the many mines that existed here before Joshua Tree became a protected area in 1936.


The trail starts off quite flat. But as you progress, you’ll soon see large hills in the distance. One of them is Mastodon Peak, and the trail will eventually take you up near the peak.


As you make your way higher, you’ll be treated to excellent views of the surrounding area. It is indeed possible to scramble up to the very top, but finding your way back down seems rather perilous.
As I had just done plenty of climbing at nearby Ladder Canyon earlier that afternoon, I was no longer feeling very adventurous and decided to keep following the trail.


Moving on, the loop trail takes you past Mastodon Mine. Established in the 1930s, it’s one of three hundred mines established at Joshua Tree which largely focused on gold, silver, zinc and copper.
Given the harsh conditions of this environment, mining at Joshua Tree was an incredible challenge. And like many, the Mastodon Mine was largely a financial flop.
Note that it’s forbidden for visitors to go inside.

While by no means ugly, the rest of the hike past Mastodon Mine is largely unremarkable, but it’s probably one of the quietest trails in the park.
For those with more time and energy, the Mastodon Peak loop trail connects to the much longer Lost Palms Oasis trail, a 7.6-mile out-and-back hike that takes you to one of the most remote sections of the park.
Lost Palms Oasis is considered to be one of Joshua Tree’s most strenuous treks, so make sure you come prepared.
Cholla Cactus Garden
The distance between Cholla Cactus Garden and Mastodon Peak is about 30 minutes by car. But if you’re coming from the main area of the park, the garden is just a 13-minute drive from Arch Rock.
So even if you don’t have time for Mastodon Peak, many visitors could probably fit the Cholla Cactus Garden into their itineraries. But would the detour be worth it?

The Cholla Cactus Garden is not a hike. Rather, it’s a simple walking trail that you can complete in under 20 minutes. If you’re traveling with non-hikers, this stop would be ideal.
But while it is indeed beautiful and one of Joshua Tree’s most popular landmarks, I wouldn’t consider it essential for hikers short on time.


East Joshua Tree
What we’ve labeled as East and Central Joshua Tree could both be considered the park’s center. But while the two areas are right next to one another, it’s helpful to split them up to make all this information a bit easier to digest.
The eastern part of the park lacks any major hiking trails, but it does contain some of the park’s most unique granite boulders. You can either simply walk to each landmark before returning to your car, or you could spend as long as you like doing some free exploration.
Arch Rock
Out of the three main uniquely shaped rocks in East Joshua Tree, this is by the far the most difficult to find. But considering the beauty of the area, getting lost here is not such a bad thing (provided you have ample water, of course).


There are some campgrounds around here and you’ll occasionally encounter trails. But they seem more like walking paths for campers rather than hikers.
As such, it’s very easy to get off path and find yourself at a dead-end blocked by large boulders.


In the end, though, finding the magnificent Arch Rock (which also resembles an elephant) is worth the effort.
If you want a more structured experience, onX features two different hikes, a 15-minute one and a 45-minute one. In my case, I spent a little under half an hour exploring the area.

Skull Rock
Skull Rock is among the easiest Joshua Tree landmarks to reach, as it’s just a few minutes walk from the road. As the name suggests, it does indeed resemble a skull – at least from the right angle.
While you can see the main landmark immediately, behind the rock are more granite boulders as far as the eye can see. And this is a very popular spot for visitors to walk atop the rocks and take photos.


Originally formed by magma beneath the earth’s surface, the granite boulder heaps gradually uplifted, after which they were exposed to many years of weathering. The end result is a lot of beautiful and odd shapes like Skull Rock and other formations.
Split Rock
Split Rock is another landmark that you can just drive right up to. Large cracks like these are caused by water seeping into cracks, which then began to expand as the temperature changes.


Geology Tour Road
East Joshua Tree is also home to Geology Tour Road which takes visitors past stunning landscapes and overlooks. Unfortunately, the road happened to be closed during my visit due to a recent fire.
The road is 18 miles roundtrip, with the final portion being recommended for 4×4 vehicles only. If you do plan on driving this road, expect the roundtrip journey to take a couple of hours.
Central Joshua Tree
The geographical heart of Joshua Tree is where you’ll find many of the park’s essential hikes. Most of them range from easy to moderate, with the emphasis being on the scenery rather than a physical workout.
During my visit, I explored Central Joshua Tree on my second day in the park, and the following hikes are presented in the order I did them. As I stayed in Yucca Valley, I entered the park from the West Entrance.
If you’re willing to start early, this is a good order to follow if you want to beat the crowds at the most popular trails.
Hidden Valley Trail
Hidden Valley is one of Joshua Tree’s easier hikes, but it’s also one of the most beautiful. As such, it should be considered an essential hike during your time at Joshua Tree National Park.
It’s a short loop trail that’s only a mile long, while the hike is mostly flat. With frequent stops for photography, it took me about 45 minutes.


Hidden Valley is named as such because it’s largely enclosed within large natural rock walls. As the valley maintains rain for longer than the rest of the region, it has its own unique microclimate, with trees like pinyons and junipers that are seldom found in other parts of the park.


In the 19th century, Hidden Valley was a place where thieves would hide their stolen cattle and horses from prying eyes, with the rustlers sneaking in their animals via a narrow hole.
But later in the 1930s, prominent rancher and miner Bill Keys wanted easier access in order to herd his cattle here, and so he used dynamite to blast a big hole in the rock!
This is the same entrance through which visitors enter the valley today.

Supposedly, the blast occurred just months before Joshua Tree was declared a National Monument by President Theodore Roosevelt in 1936.
Fortunately, thanks to it now being a protected area, it’s hard to tell that people ever grazed cattle here.


The Hidden Valley is also popular for rock climbers. And speaking of rock climbing and repelling, there are plenty of climbing tours available if that’s something you want to try during your visit.

Barker Dam Trail
This is another easy and relatively short loop trail. It should take you about 45 minutes. Note that the Barker Dam and Wall Street Mill trails share a parking lot, so plan on doing them back-to-back.


As with the nearby Hidden Valley, local ranchers herded cattle here before it was a protected area. And a dam was constructed back in 1900 both for cattle herding and mining.
Interestingly, at the time, Joshua Tree actually got double the rainfall it gets today, so cattle ranching was a viable business.


Originally built by the Barker & Shay Cattle Company, the dam was later refurbished by Bill Keys.
The pool was completely dry at the time of my visit, but according to the on-site signage, visitors can often find it filled with water.


You’ll find yet more interesting granite formations here. And of course, the eponymous Joshua trees. Fascinatingly, like many desert plants, Joshua trees grow extremely slowly at a rate of an inch per year.
But they can eventually reach over forty feet! When looking at a taller one, it’s incredible to consider how old it might be.
Believe it or not, the Mojave National Preserve to the north of the park actually contains more Joshua trees than Joshua tree itself!

Another highlight of the Barker Dam trail is the chance to see ancient Native American pictographs. While we may never understand their true meaning, we do know that various tribes left their mark here when passing through the area, often in search of water and food.
Unfortunately, the paint we see today isn’t the original. Supposedly, someone decided to trace over the originals with new paint despite not having any permission or authorization.
Wall Street Mill
Wall Street Mill is perhaps Joshua Tree’s most underrated hike. It’s an easy out-and-back hike that’s about 2.2 miles roundtrip, and you can expect to spend at least an hour exploring all there is to see.
Though right next to the popular and crowded Barker Dam trail, Wall Street Mill attracts much fewer visitors. But while it may not boast the most impressive scenery, it’s the best place to learn about historical Joshua Tree, while the abandoned buildings and cars make it a photographer’s paradise.


While, as mentioned, this hike shares a parking lot with Barker Dam, there’s actually a smaller second lot to the east that’s closer to the main trailhead. Parking there would save you about twenty minutes roundtrip.

Near the beginning, you’ll find the ruins of a building and an old rusted car. While this is presumably the way things were left, it almost feels like walking onto a movie set.
Next, you’ll walk past the windmill pump. And not long after that, you’ll encounter a fascinating marker which reveals what a chaotic place this used to be.


It was at this very spot that Bill Keys shot Worth Bagley in 1943 over a property dispute. According to Keys, he was ambushed and shot Bigley in self-defense. Nevertheless, he was arrested and served five years at San Quentin Prison.
But he was eventually pardoned, upon which he returned to Joshua Tree and erected this marker. It reads: ‘Here is where Worth Bagley bit the dust at the hand of W.F. Keys, May 11, 1943.’

Finally, you’ll arrive at the mill itself along with the original well that supplied it with water. The Wall Street Mill was purchased by Bill Keys in 1930, and it’s where he processed gold ore obtained by smaller mining operations throughout the area.
It remained in use up until 1966, though the dilapidated cars which surround it are clearly much older.


Keys Ranch
One of the most unique activities you can experience at Joshua Tree is a tour of Keys Ranch, which, as the name suggests, was the ranch of Bill Keys himself. Unfortunately, tours normally aren’t running during the summer due to the heat, so I was unable to visit.
But if you’re visiting in a cooler month, be sure to book your tour in advance at Recreation.gov.
Cap Rock Nature Loop
This short loop hike is among the very easiest trails in the park. Similar to the Cholla Cactus Garden, it’s paved, while the whole loop should only take you 10-15 minutes.


In the center of the trail is a large granite hill, on top of which is a balancing rock that seems like it could topple over at any moment. Surely one day it will, but probably not any time soon.
Cap Rock is a great option for those with mobility issues who’d like to appreciate some of Joshua Tree’s iconic scenery.


Keys View

Directly south of Cap Rock is a road that takes you directly to Keys View, a stunning viewpoint which overlooks the Coachella Valley. It’s yet another Joshua Tree landmark to be named after Bill Keys.

In the distance, you can enjoy views of the snowcapped San Gorgonio Mountain, which reaches as high as 11,485 ft. And a bit further to the left is Mount San Jacinto, whose peak reaches up to 10,834 ft, or 3,302 m.
This is a great place to take a break from hiking, while it’s noticeably cooler up here as well.


Hall of Horrors
Similar to Cap Rock, at Hall of Horrors you’ll find a loop trail that encircles a large set of boulders in the center. But the area’s name refers to a narrow corridor formed by a large crack in the rocks. And if you simply follow the trail, you won’t find it.
Rather than AllTrails or onX, use Organic Maps for this area, as it clearly indicates where the actual Hall of Horrors really is.


Once there, you’ll have to do some scrambling up and then down again to get into the corridor. And once you’re inside, it’s a very tight squeeze.
While worth entering to take some unique photos, there’s not much else too much else to do in the corridor, and I only spent several minutes inside.


Hall of Horrors was named as a must-visit attraction by Earth Trekkers, an overall fantastic website that I frequently use to research my US trips.
But in this case, I’d have to respectfully disagree with them, as I didn’t find this area to be especially noteworthy or memorable compared with other hikes in this Joshua Tree guide.

Ryan Mountain
Thus far, none of the hikes we’ve covered in this guide to Joshua Tree have any significant elevation gain. But if you’re looking for a traditional hike that involves climbing uphill to reach an impressive viewpoint, don’t miss Ryan Mountain.
The hike is 2.8 miles roundtrip with an elevation gain of 1000 ft (about 324 m). In total, it took me 90 minutes.


While a bit more strenuous than the other hikes in this guide, it could still be considered a moderate hike. It’s also a straightforward route, so you’re unlikely to get lost.
And if you’re lucky, you might spot some wildlife. On the way up, I saw a Great Basic collared lizard, a beautiful species endemic to the Western US.


Eventually, after a fairly tough climb, you’ll reach the summit, which stands at 5461 ft (1665 m) above sea level.
The peak offers a rare 360-degree view of Joshua Tree, allowing you to see the various boulder piles, valleys and canyons of the park.


Fortynine Palms Oasis
The Fortynine Palms Oasis is a single hike, but it gets its own category in this guide due to it being situated outside the main park.
While this land is indeed managed by the National Park Service, reaching the trailhead requires driving south down Canyon Rd from Twentynine Palms, the main town to the north of Joshua Tree.


This is an out-and-back hike which, as the name suggests, culminates at an oasis. In total, the hike is about three miles roundtrip and it took me around 90 minutes to complete.


The hike begins with an uphill rocky portion, and it’s not long before you can enjoy incredible views of your surroundings. The initial ascent takes you up 350 ft, before you immediately begin descending about the same amount.

Eventually, you’ll spot the beautiful green palm oasis in the distance. Obviously, that’s where you’ll want to head, but it’s still a lot farther than it looks.
Out of all the trails featured in this guide, Fortynine Palms Oasis is probably the rockiest, so be sure to watch your step.

While I didn’t spend much time at the oasis, lots of people like to hang out there for a while and watch the sunset. I did, however, walk up and down the nearby boulders to check to admire the fan palms from various levels.
Apparently, some of them are blackened due to a recent fire, but thankfully they largely survived.


While I saved it for last and even almost skipped it, the Fortynine Palms Oasis trail turned out to be my favorite hike at Joshua Tree.
It’s an absolute must-visit for those coming to the area. And as a bonus, it will like be a short drive to your accommodation when you’re finished.
It gets especially hot out here, so consider doing this hike earlier or later in the day if you’re visiting in summer.

Additional Info
There are two main towns that give one easy access to Joshua Tree National Park. To the north of the North Entrance is the town of Twentynine Palms, where the highest-rated accommodations are all rental homes.
Popular options include Cozy Fresh Desert Hideaway, Desert Twilight 29, The Joshua Tree Forest and Lovegrass by AvantStay.
While not as highly rated, there are a few small motels in town, such as Harmony Motel, Oasis Inn and Motel 6.
From Twentynine Palms, about a twenty-five drive west down 29 Palms Highway is the town of Yucca Valley. From here, you have easy access to the West Entrance.
This is where I stayed, and I was pleasantly surprised to find a Walmart right in town. This is probably the only option in this remote part of California to buy whatever outdoor equipment you might need.
Again, the most popular places to stay here are rental homes, such as Yucca Valley Oasis, Sweet Suite in the Desert and The Loft.
The few hotel options, meanwhile, include Super 8 and America’s Best Value Inn.
In regards to staying within the park, there are plenty of campsites to choose from. None of them, however, have showers. You can learn more about camping at Joshua Tree here.
Joshua Tree is about 140 miles from Los Angeles, 160 miles from San Diego and 185 miles from Las Vegas.
If you’re visiting Joshua Tree as part of a larger road trip, those coming from the south should consider visiting the Anza-Borrego Desert State Park and Mecca Hills Wilderness area beforehand. It’s then an easy drive to the Cottonwood Entrance in the south of the park.
To the north of Joshua Tree, meanwhile, is the highly underrated Mojave National Preserve. If you’re coming from Death Valley, be sure to spend a day at the preserve before entering Joshua Tree from the north.
For most of Joshua Tree, a 4×4 or AWD vehicle is not required, unless you want to drive Geology Road. Nevertheless, it’s still best to rent one if you’ll also be visiting nearby parks.
Sadly, people die in the park every so often due to extreme heat. As mentioned in the Joshua Tree Guide above, always be sure to carry ample water with you when out hiking.
It’s always astounding how many people attempt hikes at parks like Joshua Tree in the summer without carrying any water! Apparently, the problem is so bad that there are sometimes rangers near trail entrances reminding visitors to take some.
Another thing to be mindful about here is rattlesnakes. While I have yet to encounter one while hiking in Joshua Tree or any other park, it would be wise to make a habit of always watching your step, especially if you’re in an area with lots of shrubs or bushes.